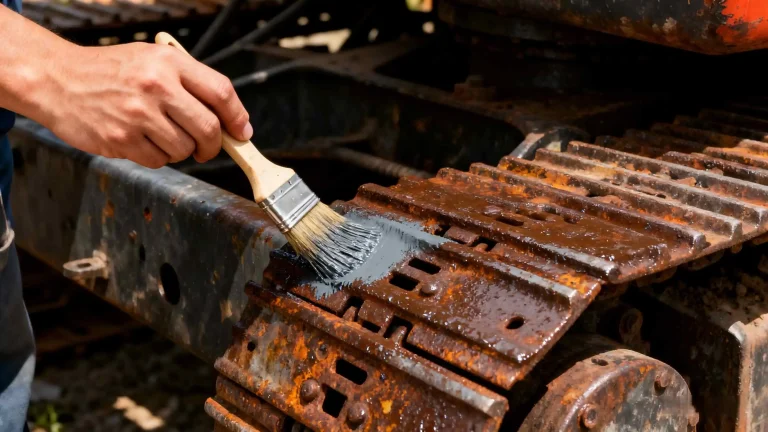
DTF film won’t peel cleanly: causes and fixes for PET transfer film production is one of those problems that looks “simple” until you’re on a line with real throughput targets. One operator says it won’t peel cleanly, but what they mean might be residue left on the print, the design lifting with the film, edges stringing, or peel behavior changing from roll to roll. If you treat all of those as the same issue and start randomly changing press settings, you can burn hours and still end up with inconsistent transfers. This guide is built for production teams—DTF PET film producers, material converters, and high-volume print operations—who need a repeatable way to isolate root cause, confirm it fast, and fix it without guessing.
Answer: DTF film won’t peel cleanly: causes and fixes for PET transfer film production
In PET transfer film production, “DTF film won’t peel cleanly” usually comes from five buckets of root cause, and the fastest path is to diagnose them in a fixed order. First, confirm peel mode and peel timing, because hot peel versus cold peel behavior can look like a coating defect when it’s really a timing mismatch. Second, verify melt and cure behavior, because under-cured hot melt powder and unstable cure profiles commonly create residue, stringing, or partial release. Third, check press contact and pressure uniformity, because uneven platen temperature and pressure create patchy peel that never looks consistent. Fourth, rule out contamination and static, which can turn release into a random event even with “correct” parameters. Finally, if your process variables are stable and the symptom still tracks to specific roll sections or batches, treat it as a film and coating consistency issue and tighten incoming QC and production controls.
The fixes that stick are the ones tied to a field verification step. If you can’t reproduce the failure with a controlled change to one variable, you haven’t found the cause yet.
What “won’t peel cleanly” really means on a production line
Before you troubleshoot, define the failure in a way everyone on the floor can agree on. The words matter because each version points to different causes.
Symptom A: The design lifts with the film during peel
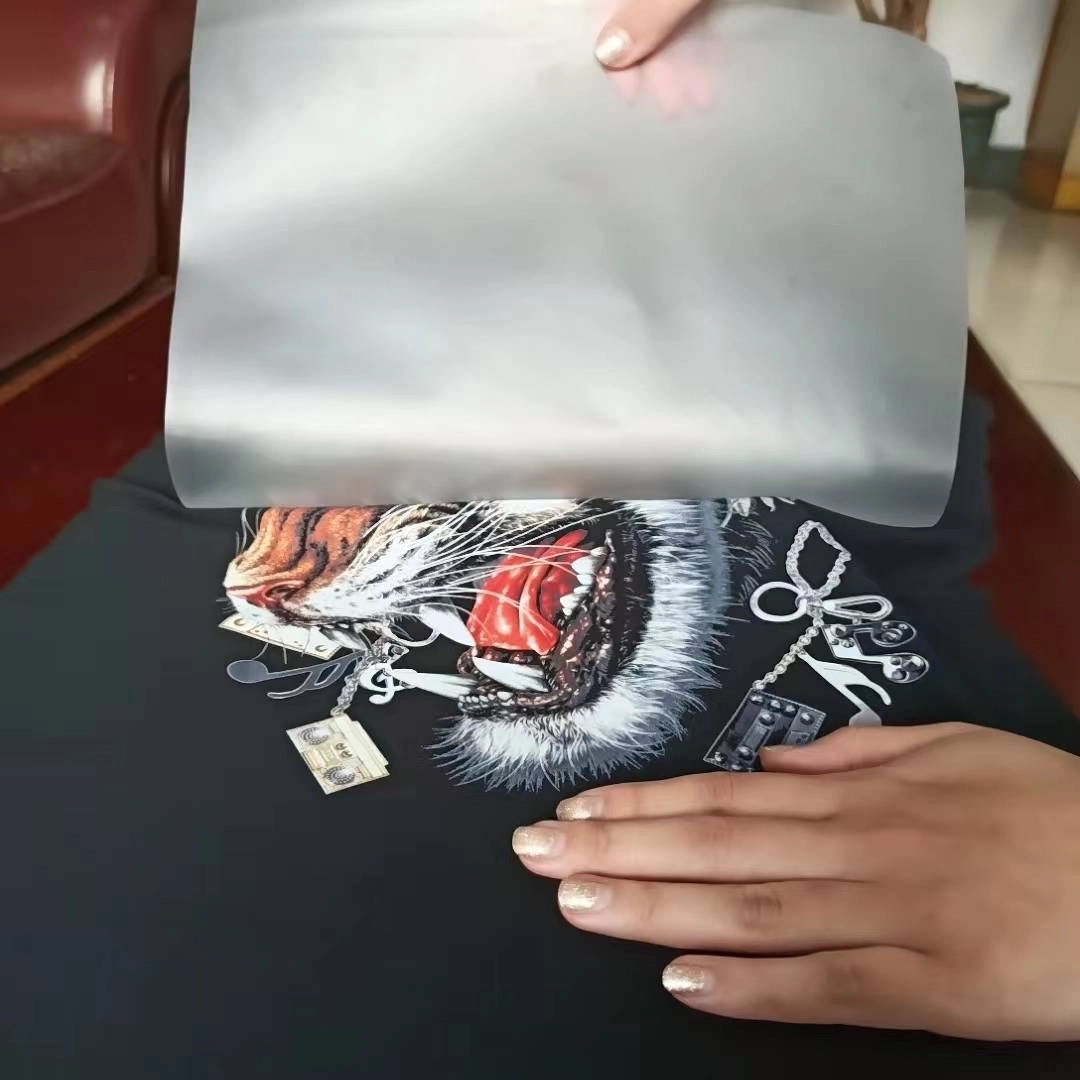
This is the classic “transfer won’t release” scenario. You peel and the image wants to come back up with the PET film, often in patches or at the edges. In production terms, it signals that the bond to fabric didn’t win against the release behavior at peel time.
Symptom B: Residue is left behind after peel
Here the transfer may look mostly correct, but you see tackiness, a faint film mark, or residue around the design. Residue can come from cure and melt behavior, excess powder, or film/coating behavior that doesn’t release cleanly under your peel conditions.
Symptom C: Edges string or tear while peeling
Stringing is a strong clue that you’re peeling in a window where the adhesive is too soft or too elastic. It’s common when peel timing is off, or when cure energy is inconsistent across the line.
Symptom D: Peel is patchy, inconsistent, or changes across the same roll
If one section of film peels cleanly and another section doesn’t—without any change in press settings—your process has a stability issue. That stability issue might still be environmental or mechanical (static, dust, uneven pressure), but it can also point to coating uniformity or handling variation.
The 10-minute line-side triage before you change everything
This is the part many guides skip. The goal is not to “try a bunch of settings,” but to run a short sequence that immediately tells you which bucket you’re in.
Check 1: Confirm peel type and peel timing window
Start by confirming whether your film is designed for hot peel, warm peel, or cold peel, then verify what your operators are actually doing. Many peel failures disappear when peel timing is standardized. Use the same printed sample and run three controlled peels: an immediate peel, a short wait, and a full cool-down peel. Keep everything else identical. If only one timing window peels cleanly, your root cause is timing and technique, not a mystery defect.
Check 2: Confirm press contact and pressure uniformity across the platen
Patchy peel often comes from uneven pressure or temperature, not the film itself. A simple verification is to press identical test strips in different platen zones—center, left, right, front, back—then peel at the same timing window. If results vary by location, you have a contact uniformity issue. In production environments, pads, worn platens, uneven pressure settings, and garment seams can create local failures that look like “bad film.”
Check 3: Quick check for under-cure versus over-cure behavior
Under-cure often shows up as tackiness, residue, and stringing. Over-cure can show up as brittle behavior or poor bonding depending on the material combination. The fastest test is a controlled cure-energy bump using the same print: increase cure energy slightly while holding press parameters constant, then compare peel behavior. If a small increase stabilizes peel, your baseline cure is marginal. If it worsens stringing or creates other defects, you may be overshooting the stable window.
Root-cause map by process stage (production-focused troubleshooting)
To keep decisions clear, the sections below follow the same pattern: inspection point, likely causes, field verification method, and fix action. Treat this like a process map. You do not need to do every step, but you do need to follow the order.
Stage 1: Film and coating consistency (release behavior, absorption, adhesive response)
Inspection point: Peel quality changes across the roll, across roll positions, or between batches while press settings stay constant.
Likely causes: Coating uniformity variation, surface handling damage, dust pickup, or static-driven contamination can create inconsistent release. In production, this tends to show up as “it was fine yesterday” or “the first half of the roll is okay.”
Field verification method: Run a controlled comparison test. Take samples from the beginning, middle, and end of the same roll and press them with identical settings and identical peel timing. If peel quality tracks with roll position, quarantine the roll and compare against a known-good roll. Also inspect whether defects correlate with visible streaks, speckling, or dust attraction during handling.
Fix action: Tighten incoming QC for peel behavior rather than relying only on visual checks. Improve film storage and handling to reduce dust and static exposure. If your production strategy is to simplify and stabilize performance through a single integrated coating approach, review the product-side targets for “clean release without residue” and validate that your incoming material meets that window using your own press and peel SOP. If you’re evaluating a coating designed specifically for PET-based transfer films, see Konaz white ink absorbent coating material.
Stage 2: Printing stage (white ink laydown and absorption behavior)
Inspection point: Smearing, feathering, or unstable edges on the film before powder is applied, followed by peel instability later.
Likely causes: Ink is not being controlled by the surface and absorption behavior, or the surface condition is inconsistent. When ink edges are unstable, later bonding and peel behavior often becomes unstable as well.
Field verification method: Inspect printed film under consistent lighting immediately after print, before powder. If edges look fuzzy or ink pools in micro-areas, compare with a second sample from a different roll section. Track whether the symptom is worse at certain times of day, which can indicate humidity or handling changes. If you can, standardize dwell time between print and powder to eliminate timing drift as a variable.
Fix action: Stabilize film handling, reduce opportunities for dust and static, and align ink laydown and drying rhythm to the absorption behavior of the film. If you are running high volume, the “fix” is often a tighter SOP, not a dramatic parameter swing.
Stage 3: Powder application (coverage, evenness, and excess control)
Inspection point: Some zones transfer cleanly while others tear or leave residue, and the pattern of failure matches powder coverage.
Likely causes: Uneven powder distribution, excess powder that doesn’t melt evenly, or clumping that creates thick spots. Thick and thin zones don’t melt and bond the same way, which then looks like inconsistent release.
Field verification method: Compare the visual uniformity of powder coverage across the image. Then run a controlled sample where powder application is deliberately even and consistent, and compare peel outcome. If a more uniform application dramatically improves peel, you’ve found a major driver. Also check whether powder coverage varies with static conditions, because static can pull powder unevenly onto edges and fine detail areas.
Fix action: Standardize powder laydown and removal in a way operators can repeat, shift after shift. If you’re running roll-to-roll production, treat powder coverage consistency as a measurable quality variable, not a “feel” variable.
Stage 4: Curing and melting (where peel problems are created quietly)
Inspection point: The transfer looks good pre-press, but peel fails with stringing, residue, or partial lift after pressing.
Likely causes: Under-cure, uneven cure profile, or cure instability between zones. Cure instability can come from airflow, heater drift, belt speed variation, or line loading changes.
Field verification method: Press the same test file produced under baseline cure, then repeat after a small controlled cure adjustment. If peel improves, your cure was marginal. To pinpoint inconsistency, map failures to oven position or time window. If the first hour of the shift is consistently worse, you may have a warm-up stability issue. If failures cluster in one lane, you may have profile imbalance.
Fix action: Lock down cure profile, validate actual temperature and dwell, and document it as a production control point. A stable cure window is often the difference between “sometimes peels” and “always peels cleanly.”
Stage 5: Heat press application (temperature, time, pressure—verified, not guessed)
Inspection point: Peel failure appears only on certain presses, certain platens, certain garment types, or certain operator stations.
Likely causes: Uneven platen temperature, uneven pressure distribution, insufficient dwell time, or poor contact caused by garment texture and thickness.
Field verification method: Verify platen temperature across multiple points, not just the display setting. Then press identical test strips in different platen zones and compare peel. Also test with a flat, consistent substrate to separate “press behavior” from “fabric behavior.” If peel is clean on a flat test but fails on textured garments, the issue is contact and substrate, not the film alone.
Fix action: Calibrate press equipment, standardize pads and cover sheets, and create a quick press verification routine operators can run at the start of a shift. Consistency beats hero settings.
Stage 6: Cooling and peel technique (operator variability that masquerades as a material defect)
Inspection point: The same batch peels cleanly sometimes and fails other times with no clear process changes.
Likely causes: Peeling too early or too late, peeling at inconsistent angle and speed, or mixing peel methods across shifts.
Field verification method: Use a timed peel test with a simple stopwatch and a posted peel window. Have two operators perform the same peel method on the same sample and compare. If results differ more than expected, technique variability is part of the cause.
Fix action: Create one peel SOP per film type and train to it. In production, “clean peel” is not just a material property; it’s a controlled action.
Prevention and process control that reduces repeat peel failures
Once you solve the immediate issue, prevent the same failure from coming back as “mystery variability.” Production teams get leverage by improving traceability and control points. Keep a simple production log that links film roll ID, print conditions, powder batch, cure profile, press station, and peel timing window to the outcome. When peel issues return, that log saves time because it lets you isolate what changed.
Environmental control matters more than people think. Dust and humidity don’t just make things messy; they change static behavior and surface conditions, which can shift peel reliability. Film storage and handling should be treated as part of the process, not an afterthought. If your operation supports multiple substrates—cotton, polyester, nylon, blends—validate peel stability on representative substrates instead of assuming one setting works everywhere.
When you need a second set of eyes on the process, or you want to align your line with a coating and workflow designed for mass production stability, use Konaz technical service support to discuss your line conditions and target performance.
Where a 3-in-1 coating spec can eliminate peel instability
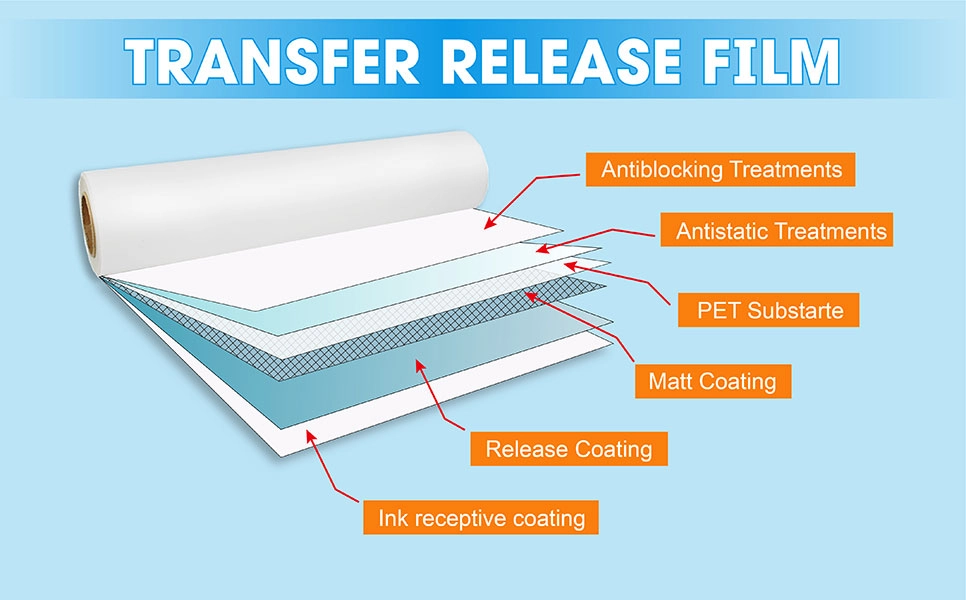
Many peel problems are ultimately “system problems,” not single-parameter problems. When release behavior, ink control, and adhesive response are handled as separate layers with separate processes, there are more points where variability can creep in. A 3-in-1 coating approach is designed to simplify that system by integrating the release layer, ink-absorbing behavior, and hot melt adhesive response into one coating formula and one coating process. In practice, that can reduce workflow complexity and improve stability in mass production environments, because you’re controlling fewer interfaces and fewer opportunities for mismatch.
For producers working with PET-based transfer films for DTF and heat transfer printing, this is also where material specs and incoming QC become more meaningful. You’re not just checking “does it look okay,” you’re checking whether the film repeatedly hits the same clean-release behavior under your press and peel SOP. If peel issues are cutting into output and you want a material designed around clean release and consistent transfer, review Konaz 3-in-1 coating for PET transfer films.
About Foshan Konaz Technology Co., Ltd.
Foshan Konaz Technology Co., Ltd. focuses on advanced functional coating materials for industrial and digital printing applications. The company describes two flagship product directions: high-temperature resistant coatings built for severe heat exposure on metal surfaces, and a 3-in-1 coating solution for PET-based transfer films used in DTF and heat transfer workflows. In addition to performance targets like high heat durability, stable adhesion, and predictable release behavior, Konaz emphasizes manufacturing efficiency—reducing process steps, supporting mass production stability, and offering formulations that can be tuned to different production lines and application needs.
Conclusion
When DTF film won’t peel cleanly in PET transfer film production, the fastest solution is not a random parameter hunt. It’s a controlled diagnosis: define the exact peel failure mode, confirm peel timing and peel type, verify cure energy and press contact uniformity, then isolate whether the symptom tracks to environment, handling, or film/coating consistency. Once you tie a fix to a repeatable verification step, peel quality becomes predictable again. That predictability is what keeps production moving, reduces waste, and makes it easier to scale output without fighting the same problem every week.
FAQs
Why does my DTF film leave residue when I peel it?
Residue often points to a marginal melt-and-cure condition or excess powder that isn’t behaving consistently. Start by standardizing peel timing, then test a small controlled cure-energy increase while keeping press settings constant. If residue drops sharply with a small cure adjustment, your baseline cure window is too narrow for production stability.
Why does the design lift with the film instead of transferring?
This usually happens when the bond to the substrate isn’t winning against the release behavior at peel time. Verify that you’re using the correct peel mode for your film and that peel timing is consistent. Then confirm press contact and pressure uniformity, because patchy pressure can create partial bonding that fails during peel.
Hot peel vs cold peel: why won’t my DTF film peel cleanly?
If the film is designed for hot peel but you peel after full cool-down, or if a cold-peel film is peeled too early, release behavior can look like a defect. Run a timed peel test on the same sample—immediate, short wait, full cool-down—and you’ll usually see a clear “clean window” if timing is the main issue.
Can under-cured powder cause DTF film to not peel cleanly?
Yes. Under-cure can create tackiness, stringing, residue, and inconsistent release because the powder hasn’t fully melted and stabilized. The quickest check is to keep press settings constant and adjust cure energy slightly to see whether clean peel becomes repeatable.
How do I tell if the release layer is why my DTF film won’t peel cleanly?
If peel behavior changes across the roll or between rolls while your press, peel timing, and cure settings are stable, suspect film and coating consistency. Compare peel results from different roll positions under identical conditions. If the failures track to roll location or batch, quarantine the material and tighten incoming QC around peel behavior rather than visuals alone.